How to install Hostgator Free SSL certificate on a domain name (SIMPLE STEP BY STEP PROCEDURES)
Yesterday, Thursday, the 16th of April, 2019, i experienced another Eureka! moment in Blogging.
After so many trials and errors, I finally figured out how to install hostgator’s free SSL certificate on my domain name solowayne.com thereby eliminating the dreadful “Not secure or Insecure” notification which often appears beside my domain name in web browsers.

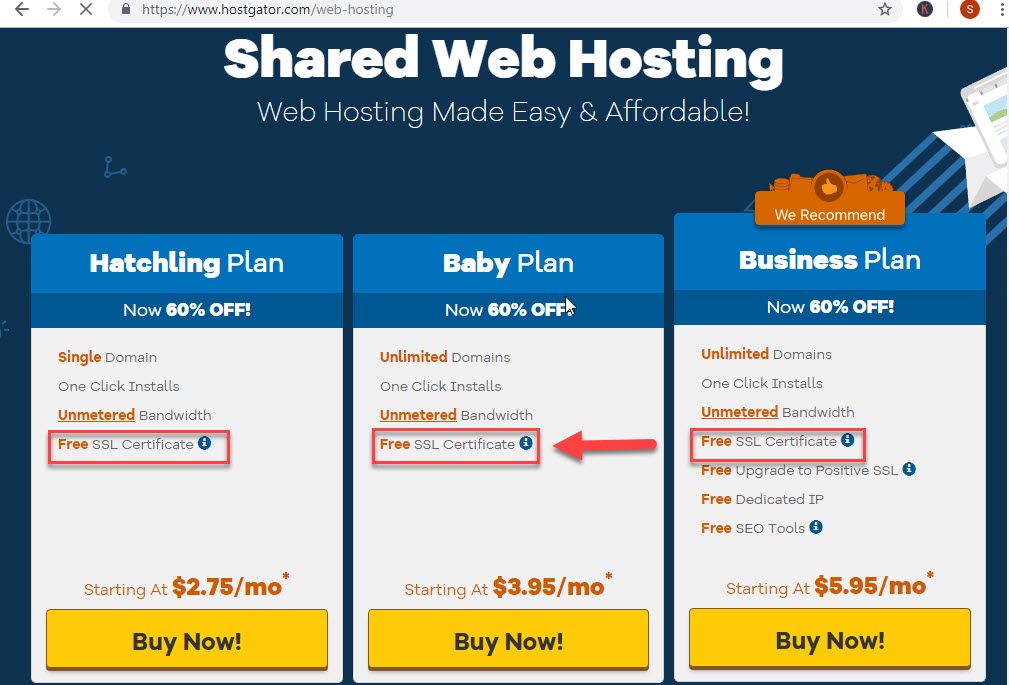
One of the reasons why i decided to rent a hosting space at Hostgator.com is because Hostgator offers free SSL certificate for their shared hosting package. Other Web hosting providers sell SSL certificates to their clients for more than $100 per year.
So i thought signing up for a hosting service at Hostgator, will enable me to save $100 yearly; which could be spent on Facebook ads/Adwords or on a new WordPress theme.
However after i signed up for a shared hosting package at Hostgator, i found it difficult to install the “Free SSL certificate” offered by Hostgator.
After trying (multiple times) to install Hostgator’s Free SSL on my domain but to no avail, i thought the “Free SSL” advertised by Hostgator was just a marketing bait used by Hostgator to get clients. In otherwords i thought Hostgator doesn’t offer Free SSL certificates (as stated in their shared hosting package).
After i couldn’t figure out how to install Hostgator’s free SSL certificate on my domain. I just decided to ignore or forget about the confusing SSL stuff and focus on publishing articles on my blog…after all my blog is just a news blog and not an eCommerce website which requires web visitors to buy products,, login, register or enter their personal/billing information on my blog.
However after i got involved in to affiliate marketing, SSL certificate became indispensable to my blog. I felt like…nobody will like to take advice from a blog which has been flagged as “INSECURE” by Web browsers.
Owing to the aforementioned fact, i was compelled to install SSL certificate on my blog. This time it was a must (do or quit blogging)
To cut a long story short, after carrying out more than three hours of research (and almost scratched off my wig ), i finally figured out how to install Hostgator Free SSL certificate on my blog.
Ignorance is greatest stumbling block in our lives.
I was very surprised to find out that it is very easy to install Hostgator’s free SSL certificate on a domain name (and i almost hired a web programmer for this).
In this article, i,m going to tell you everything i did in order to install Hostgator’s Free SSL certificate on my blog.
As you can see, my blog is no longer insecure.
If a non-techie like me could install Hostgator’s Free SSL certificate on a domain name, then you can also install SSL on your own domain name.
Follow the step by step procedures below to learn how to install Free SSL certificate on your Hostgator hosted domain.
Like i mentioned earlier, its very easy to install Hostgator’s Free SSL certificate on a domain (10 times easier than the procedures to create a Facebook account).Within 4 minutes, you will be able to install SSL on your domain name.
Ok the foreplay is over now. Let’s get down to business so that you can see exactly what i,m talking about.
5 STEPS TO INSTALL HOSTGATOR’S FREE SSL ON A DOMAIN NAME.
- LOG into Hostgator CPANEL
To install Hostgator’s Free SSL certificate on your domain name, the first thing you will need to do is, to login in to your Hostgator Control panel.
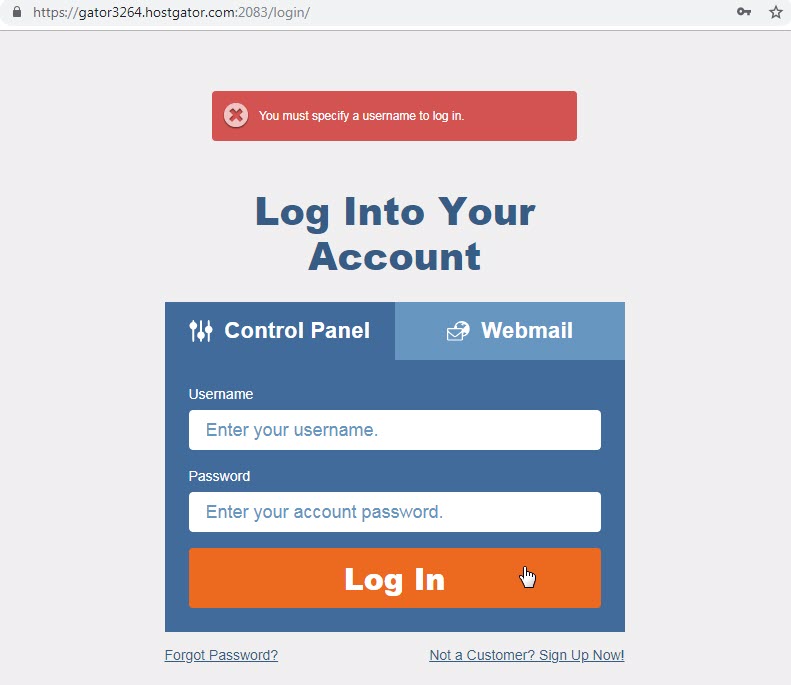
Your Cpanel Username and Password, can be found in one of the confirmation/welcome emails which Hostgator sent to you after signing up for a web hosting package at Hostgator.com.

For those of you who don’t know, Hostgator Control Panel (popularly called Cpanel) is like the dashboard of your Hostgator hosting package. Cpanel contains lots of tools which you can use to manage your blog/website. When something goes wrong, on your blog/website the web programmers go to your Cpanel to fix it.
Step 2; After you have logged in to your Cpanel, scroll down to the SECURITY section of your Control Panel and click on the SSL/TLS link as shown in the screenshot below.

After you have done that, you will be taken to the SSL/TLS page of your Cpanel; where you will presented with 4 options.
Click on the 4th option which says install and manage SSL for your site (HTTPS).

On the next page, choose the domain name that you want to install SSL certificate on.

In the screenshot below, you can see that i have selected my domain name.You can install SSL certificate on Addon domain and Sub domains.
Select your domain name and click on the Autofill by domain for the other requirements to be filled automatically.

After you have done that, scroll down and click on the Install SSL Certificate button for Hostgator’s Free SSL certificate to be install on your selected Addon domain or Sub domain.

Congratulation! SSL certificate has been installed on your domain name. Now if you type your domain name in to a web browser with the “https://” prefix (e.g https://www.solowayne.com), when your website loads up on a web browser, a little lock icon will appear beside your domain indicating that SSL certificate has been installed on your website/blog.
However we are not done yet.
Even though SSL certificate has been install on your domain name, the NOT SECURE or INSECURE notification will still appear beside your domain name if you type your domain name in to your web browser without the HTTPS:// prefix. For example if you type www.yourdomainname.com in to your browser, your website or blog will still be flagged as NOT SECURE by web browsers.
It should be noted that information flows to and from a website through two channels/protocols which include;
- Hyper text Transfer Protocol (HTTP://) and
- the Secure Hypertext Transfer Protocol (HTTPS).
It should be noted that when you are browsing a website, you are either downloading/retrieving information/files from the database of the website or uploading information/files to the database of the website.
The information/files which we often upload to/ download from a database, flows through the two aforementioned channels i.e. HTTP:// and HTTPS:// before reaching a database or before appearing on our web browser (in a case where you are downloading).
HTTP:// is the default channel which information/web files flows on the World wide Web. This explains why if you type your domain name in to a web browser without adding any of the two prefix, your website will always appear on the address bar with the HTTP:// prefix.
However even though the HTTP:// is recognized by most web browsers as the default channel, it is an INSECURE channel…i.e. any information/data/file sent to a database through the HTTP:// channel can be intercepted by a hacker before it reaches a database.
For example when you fill your personal details in to a website and click send, the information passes through the HTTP://’ (which is made up of a network of so many computers) before reaching its final destination (a database). While the information is on its way to a database, a hacker can use a sophisticated software to intercept and read the information. Most hackers have stolen thousands of credit card details due to this loophole.
To cut a long story short, the main difference between the HTTP:// and the HTTPS:// is that, information/data flows through the HTTP:// channel in plain text which makes our sensitive information vulnerable to hackers; who may intercept our information/data before it reaches a database (final destination).
Unlike the HTTP:// channel, information or data which passes through the HTTPS:// channel is encrypted while on transit to ensure that if a hacker intercepts our sensitive information, they won’t be able to read it.
To make SSL certificate fully functional on our website/blog we need to make the secure HTTPS:// channel the default channel through which information flows to and away from the database of our website…so that whenever our domain name is typed in to a web browser, our domain name should always appear on a web browser with the HTTPS:// prefix (which is the secure/encrypted channel).
If Your website is powered by WordPress it will be very easy to redirect all your web traffic to the HTTPS:// channel.
This is what you need to do…
- Go to the plugin section of your WordPress dashboard and search for a plugin titled “REALLY SIMPLE SSL”.

- Install and activate plugin.
- After you have installed and activated the plugin as shown in the screenshot above, a little notification will appear at the center of your wordpress dashboard asking you to click on a blue button to finally activate “REALLY SIMPLE SSL”. Click on the button and you are done.


After you have activated SSL, WordPress will automatically sign you out.
Log into your dashboard again.
Thats all !. Hostgator Free SSL certificate has been successfully installed on your domain name. Now your domain name will always appear with the secure HTTPS:// prefix whenever anybody types your domain name in to a web browser.
Comments
0 comments
